This is Step 11 of a multi-part series on how to build a road bike. There is a free eBook available that gives you instant access to the following:
-
A FREE 43 page Full Color eBook – Available in PDF and iBook Format (iPhone/iPad)
- 15 FREE HD Step by Step Videos
- 110 FREE Full Color Pictures
NOTE* All Park Tool pictures are courtesy of Park Tool. Thank you Park Tool!
To see Step 1, Installing your Bottom Bracket, click here.
To see Step 2, Installing your Crankset and Pedals, click here.
To see Step 3, Installing your Fork, Stem, and Handlebar, click here.
To see Step 4, Hanging your Derailleurs, click here.
To see Step 5, Installing your Saddle, click here.
To see Step 6, Installing your Shifters, click here.
To see Step 7, Installing your Cassette and Wheels, click here.
To see Step 8, Mounting your Brakes, click here.
To see Step 9, Aligning your Rear Derailleur, click here.
To see Step 10, Cutting and Installing your Chain, click here.
Step 11 – Installing Cables and Housing
What You Need
Tools:
 |
| Tools |
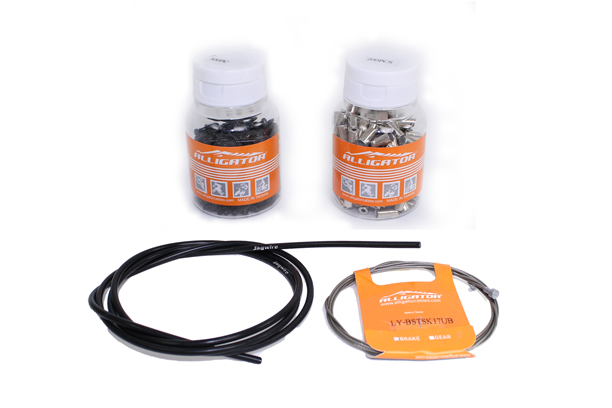
Parts:
- Brake and Shift Cables
- Brake and Shift Cable Housing
- End Caps (Ferrules for Brake and Shift
- Cable Housing)
 |
| Parts |
Before You Get Started
- Cable housing comes in two different sizes. Be sure you have both shift cable housing AND brake cable housing.
Installation
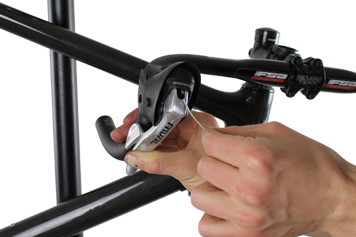
1. Actuate the brake lever and insert the brake cable into the hole at the top of the brake lever (see Figure 1). Note: Inside the brake cable hole at the top of the brake lever is a “cable stop cylinder”. The cable stop cylinder has a “countersunk” side and a “non-countersunk” side. Make sure that the head of the brake cable seats in the countersunk side of the cable stop cylinder.
 |
| Figure 1 |
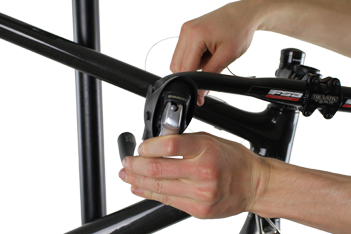
2. As you continue to feed the brake cable into the brake cable hole, it will eventually pop out of the back end of the shifter. Continue feeding the brake cable all of the way through the shifter until the head properly seats in the cable stop cylinder (see Figure 2).
 |
| Figure 2 |
3. Before inserting the shift cable, be sure to completely unload your shift lever. Unloading your shift lever is the equivalent of having your chain in the smallest gear of your cassette or the smallest chain ring.
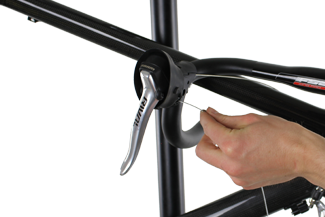
4. Insert the shift cable into the shift cable hole. The shift cable will pop out of the other side of the shifter (see Figure 3). Continue feeding the cable all of the way through the shifter until the head of the cable properly seats inside of the shifter (see Figure 4).
 |
| Figure 3 |
 |
| Figure 4 |
5. Cut lengths of brake and shifter cable housing to run from your shifter to your brake and shifter housing stops on your frame. For the front brake, you will only need enough housing to reach the front brake. Note: This may be slightly different if you have internal cable routing. Often times you will push a complete length of housing through the frame instead of ending at cable stops. Make sure you leave enough length so that your handlebar turns freely without any restriction from the cable housing. Please watch the accompanying video for more information and a better visual demonstration.
6. After the cable housing is cut to the proper length, install end caps (ferrules) to the ends of your housing.
7. Feed the brake and shift cables into their respective housing and insert the ends of the cable housing into the guides of your shifters (see Figure 5 & Figure 6).
 |
| Figure 5 |
 |
| Figure 6 |
8. Feed your cables and housing into their respective cable stops (or internal routing holes).
9. At this point, the housing for your front brake and derailleur should be complete. Your rear brake and derailleur cabling should need once more piece of housing each.
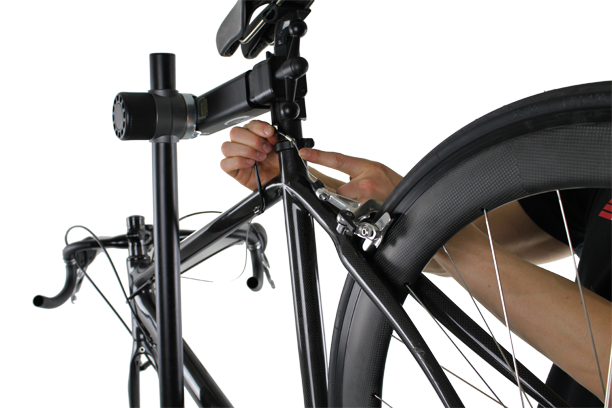
10. Starting with your rear brake, continue running the bare cable to the second cable stop. Now you will need to cut a small piece of cable housing to run from the second cable stop to the rear brake. Be sure to cover both ends of the cable housing with end caps (ferrules). Run the cable through the last piece of cable housing (see Figure 7). This will complete the cable and housing run for your rear brake. We’ll connect the brake cable in a later step.
 |
| FIgure 7 |
11. Both the front and rear derailleur cabling should run to the bottom of the bottom bracket. There will be a guide for each derailleur cable underneath the bottom bracket. Feed each derailleur cable through its respective guide. We haven’t included a picture for this because each bike is different. Just keep in mind that the front derailleur cable will typically feed through the frame and pop out near the front derailleur, and the rear derailleur will be guided towards the rear of the bicycle.
12. At this point you have completely run the cabling for your front derailleur. We will connect the derailleur cable in a later step.
13. After you have run your rear derailleur cable through its guide underneath the bottom bracket, continue running the bare cable along the drive side chain stay until you reach a cable stop.
14. Cut a piece of cable housing to run from the cable stop on your chain stay to the barrel adjuster on your rear derailleur (see Figure 8). Note: This piece of housing will create a loop as it turns around to feed the cable into the barrel adjuster of the rear derailleur. Be sure to not make this loop too small, as it will restrict the motion of the cable inside. You won’t want to make it too large either. Watch the accompanying video to get an idea of the proper size piece of cable housing.
 |
| Figure 8 |
15. Once the cable housing is cut, feed the derailleur cable through the last piece of housing to complete your rear derailleur cable run. We will connect the rear derailleur cable in another step.
This completes installing the cables and housing.
We hope you enjoyed this how-to article. For more great content, please register for our free monthly newsletter at the top of the column on the right. We send links to all the articles we post during the month.
Co-founder at FLO Cycling. Jon manages the day to day operations and acts as the lead engineer for all FLO products.