
-
A FREE 43 page Full Color eBook – Available in PDF and iBook Format (iPhone/iPad)
- 15 FREE HD Step by Step Videos
- 110 FREE Full Color Pictures
- Torque Wrench (TW-1 or TW-5)
- Socket and Bit Set (SBS-1)
- Hex Set (HXS-1.2)
- Cutters (SP-7)
- Pliers (NP-6)
 |
| Tools |
- Cable Tips/End Caps
 |
| Parts |
- Make sure your brake and shift cables are free of any cuts or frays before installing.
Installation
1. Starting with the front brake, feed the brake cable through the barrel adjuster of the front brake. Note: Be sure to screw the barrel adjustor all of the way in and then back it off one full turn before tightening your brake cable. Make sure the end cap (ferrule) on the end of your housing properly seats in the barrel adjuster.
 |
| Figure 1 |
2. Feed the brake cable underneath the brake cable bolt and remove all slack from the cable (see Figure 2).
 |
| Figure 2 |
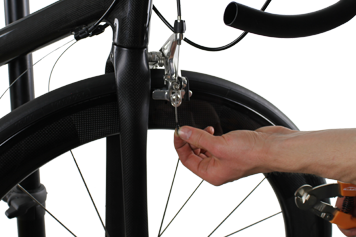
3. You will more than likely need a friend for the next step. Manually press the brake pads towards the brake track. You’ll want to hold the brake pads about 1mm away from the brake tracks (see Figure 3). Use a pair of pliers to pull the brake cable tight and then tighten the brake cable bolt to the manufacturer’s recommended torque value using a torque wrench.
 |
| Figure 3 |
4. If you are installing new brake cables, they will likely stretch after applying the brakes the first several times. After stretching your brake cable, back off your brake cable bolt and repeat the last step.
5. You can repeat all of the above steps to connect the rear brake cable.
6. You now have properly connected brakes.

Co-founder at FLO Cycling. Jon manages the day to day operations and acts as the lead engineer for all FLO products.